
Have you seen the lovely aesthetic desktop organizers and found them beautiful to look at, but not quite right for your needs? Or have you been itching to create your own aesthetic desktop organizers but didn’t know where to start? In that case read on 🙂 In this tutorial I am going to show you how to take one of our free Makebreaks atheistic desktop wallpapers and turn it into your very own custom aesthetic desktop organizers in just a couple of minutes – and for free!
We have some free aesthetic desktop wallpaper organizers ready made for you (check them out HERE), and these are available for download including both headings and versions without headings, and these are great if you like how we’ve laid them out – however, if you want to create your own from our growing collection of aesthetic desktop wallpapers and create your own organizer, you’ll find it’s incredibly easy to do!
While you can use any graphics editor to do this, I’m going to use a free browser based application called Photopea. I am guessing that if you already have Photoshop or the premium version of Canva, you are going to know how to do this, therefore I am writing this tutorial for people without in depth knowledge of graphics applications but are keen to learn 🙂
How to Make Aesthetic Desktop Wallpaper Organizer Using MakeBreaks Free Wallpapers
Without any further ado let’s get started!
You will find a video at the end of this tutorial. This walks through the main steps – however I share my office with two happily cheeping lovebirds and a gang of noisy dogs and cats – so the quality isn’t great but if you can ignore the cheeping, it will show you what to do. But if you prefer written tutorials (which I personally prefer), read on.
Step 1 – Choose Your Wallpaper
Of course, this will work with any desktop wallpaper which you have access to in JPG or PNG format. However, if you don’t have one to hand, check out our growing selection of free aesthetic desktop wallpapers. Download the wallpaper and save it to your computer. All our freebies come zipped for ease of download, so remember to unzip the file before use.
You will notice that we offer rations, 3:2, 16:10 and 16:9 (not sure what this means? It’s the dimension of your screen – if you are not sure just try them until you find the one that looks best).
Step 2 – Create Your Organizer
Before you start, think about how you would like your organizer laid out and what headings you would like. If you’re not sure yet, just have a go at creating some boxes and adding text and then create your organizer ‘for real’ later.
Head to Photopea – this is a free browser based application, so nothing to download and install!

Select ‘Open From Computer’ – navigate to where you have saved the wallpapers and pick a wallpaper and open.

Before we go any further, take a moment to familiarize yourself with the navigation. I’ve highlighted the tools we are using in this tutorial in the screenshot.
TIP: Check ‘autoselect’ – this makes life a LOT easier. When this is checked, you just click on an object to select it.
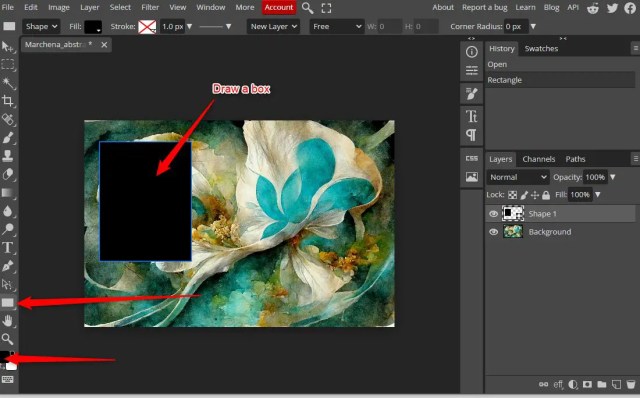
Use the object tool to draw a box. You will see this in the left hand tool bar towards the bottom. By default it shows a rectangle, however if for any reason you see another shape, click on the arrow to show more options.
Take a look at the bottom of the tool bar and you will see the color we’ve used. Don’t worry about this now, it’s super easy to change.

To adjust the dimensions of the box you’ve just created either grab the handles in the centre of each edge or at the corner. If you want to change the position, click on the move tool at the top left.

When you are happy with how the box looks and it’s in the right place, click on the tick to accept the changes.

To change the color of the box, double click on the box icon in the layer panel at the right of the page. This will open the color picker. Then, just click anywhere on the image to select a color (I said it was easy 🙂 ). If the color panel box itself is in the way, just drag it out of the way so you can click to pick a color.

Change the opacity to give the box some transparency.
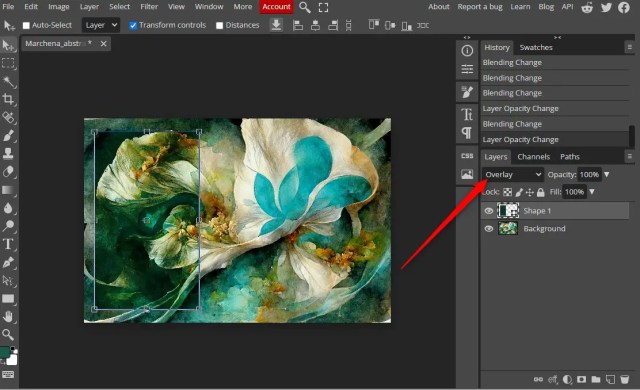
If you fancy trying some different effects, try the blending options in the panel on the right. I used ‘Overlay’, however the look you will achieve will depend very much on the background and color you choose – experiment!

When you are happy with how the box is looking, duplicate it to make more boxes, (either go to Edit > Copy and Edit > Paste or use Control C and Control V). Create the layout by duplicating the boxes and dragging them into place. I made smaller headers for each box by repeating the steps above, but this time I left the box at full opacity with no blending mode and resized it so it covered just the top of the box to provide the background for the text.
Use the text tool to add text and drag on the handles to resize the text.

When you select the text tool, you will see a text tool menu appear at the top. From here you can change font, size and color.

Remember to select the move tool to move elements.
TIP: If you can’t move small items like the text, zoom in until you can.

TIP: If you can’t see the text or other objects you have added, take a look at the layer panel and see if the text or object is ‘hidden’ behind another layer. If so, just grab the layer and move it to the correct position.

When it is finished to your liking, just go to File > Export and export your finished page as a JPG or PNG. There is no need to resize, but do give your file a different name so you don’t overwrite the original!
*** If you think you will want to edit the graphic again, go to File > Save PSD and save this to your computer. ***
Video Tutorial
This is a video tutorial showing the steps above – however do be aware of the lovebirds who make their presence known occasionally 🙂
Next Steps
Well, the very next step is to load and use your wallpaper. You’ll find another tutorial explaining how to load the wallpaper HERE.
But after that, I am sure you’ll be getting itchy fingers again and want to try customizing your free Makebreaks wallpapers some more. Stay tuned as we have more tutorials coming!
Add Calendars & Other Elements
If you want to use our free calendars to add to your organizer or add graphics and other elements, see our tutorial HERE.


