
If you are on the hunt for unique clipart or illustrations and don’t believe you can draw it yourself – it’s time to think again 🙂 If you have a tablet with stylus (not completely necessary but certainly a lot more convenient), along with a drawing app like Procreate (iPad), Medibang (everything, Sketchbook (Android, iOs) or any other of the plethora of great drawing and digital art apps available both free and paid-for, just grab one of our Free DYO (draw your own) clipart templates and jump right in!
What are Draw Your Own Clipart Templates?
These are basic figures which you can use as the base for your design. They are not designed for you to copy exactly (although, of course you can), but as a guide for you to build upon to make it your own custom work.
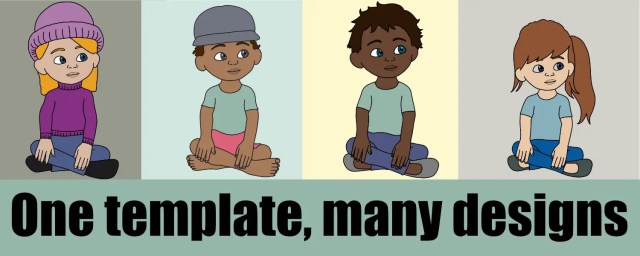
The templates form the base for your figures and you can add your own hair, clothes, skin color – change anything you like to create custom figures.
You’ll soon find that as your confidence grows, so does your creative super-powers and you will be creating all sorts of unique characters 🙂
Download Your Free Draw Your Own Clipart Template
Before you start, you’ll need to download a template. You will find our growing range of draw your own clipart templates below:
How to Draw Your Own Clipart With Our Free Templates
Drawing your own clipart is as easy as this!
1: Import the Template

The first thing to do is to import the template into your drawing app. I am using Procreate, however the process is pretty much the same whatever app you use.
Add the template to your drawing canvas as the bottom layer. Note how I have changed the background color so the template shows up.
Create a canvas of the size you desire (I am using 2500px square)
Change the opacity of the template layer to around 50% and then add a new layer to draw on.
2: Start Tracing

Start tracing around the template. Make sure you are not drawing on the template layer!!
I am using a line with is 5% (Procreate) and the canvas size is 2500px square.
Remember, the aim is to create your own character so add sleeves for t-shirts, or a cuff for a long sleeve shirt.
Here you will see I am drawing a t-shirt so I am adding in the sleeves.
3: Make It Yours

Feel free to change up the different elements to make it yours! See in this image how I am making smaller eyebrows. I think this is more in keeping with younger characters.
You will also see I have only drawn the mouth and not the lips. I will later draw the lips with a thinner line as I feel the thinner line makes them look less like they have a bad case of lip-liner abuse!
4: Add Shoes

The template character has bare feet – so I am drawing in a pair of shoes in this image. If you take a look at the examples above, you will see I have also drawn boots.
Tip: When you are experimenting like this, use a new layer. This way, if you don’t like what you have done or you want to try a number of different looks, you can add each to a new layer and that way you are not having to carefully erase sections from the original.
5: Add Hair

I always add hair to a new layer which is on top of the base character. This way, when the hair is filled with color, the features underneath do not show. It also means I can mix and match hair styles.
Hair can be the most challenging thing to draw when using templates (however I do have some free hair templates you can use).
However, the main thing is to just have fun. If the hair you draw looks a bit odd – delete the layer and start again!
You can also try looking for ideas on Pinterest or Google images. If this is private use, there’s no reason why you can’t copy an image into your work to trace and adapt.
6: Start Adding Color

Now just start adding color!
Tip: before you start, duplicate your line art! This way, if anything goes wrong you still have your base lines to work with.
I use the flood fill to color the character, if there are any open edges which means I can’t use the flood tool, I create a layer underneath and use the paint brush to color this section.
Tip: If you are going to merge the layers before coloring, erase any areas that overlap, like the eyebrows on the image above.
7: Add Finishing Touches

Continue adding color until you’ve finished. Remember to add finishing touches such as the eye lights (little white dots) which will bring your character alive.
If you are creating clipart to use in educational resources, you are also likely to want to create a black and white version.
The key thing to remember is there are no rights or wrongs here! The template is just a guide, follow it precisely if you want to start, but as soon as you get confident, start to vary it and just have fun 🙂
I’d love to see what you do with these templates. Use the tag #dyoclipart and @makebreaks to let me see what you are creating 🙂


