Blog

Free Illustrated Alphabet Letters – Animal Alphabet

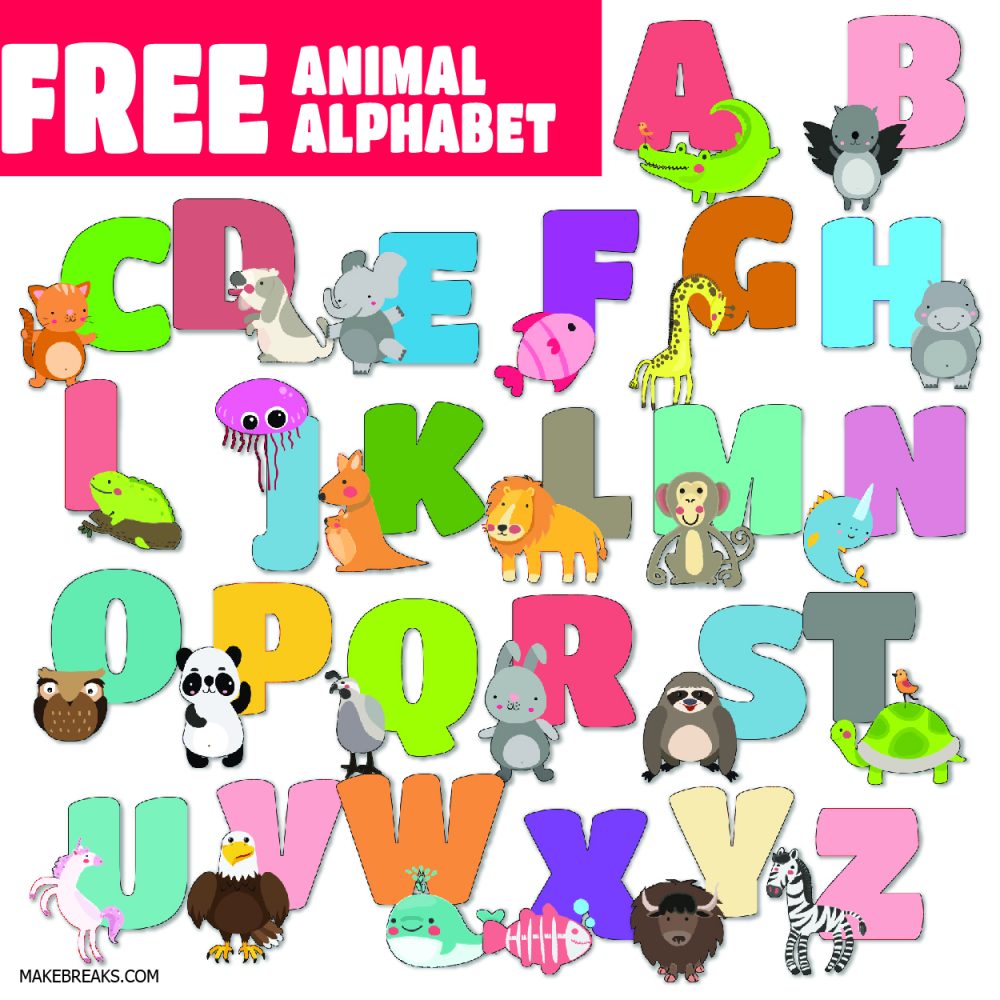
This set of free illustrated letters includes each of the 26 letters on separate pages. Each features a letter with a corresponding animal whose name starts with the relevant letter. These letters are ideal to make posters or worksheets, for letter of the week project and other letter and alphabet lessons and crafts.

PNG Format with Transparent Background

These animal alphabet graphics are in a PNG format with a transparent background. This means you can layer them with other graphics to make your own worksheets etc.

Use these letters to make letter of the week posters, to create classroom posters or just to help young ones learn the alphabet.

If you are looking for more printables for classroom use, we have more clipart here – FREE CLIP ART and you’ll find our easy-cut letter templates here – FREE EASY CUT LETTER TEMPLATES.

These animal letter graphics are in a PNG format and zipped together for ease of download.

Don’t forget to sign up to our free printables newsletter! Be the first to know of new freebies and other fun things! SIGN UP HERE 🙂

Download Free Illustrated Alphabet For Teachers

ANIMAL ALPHABET – Illustrated Alphabet

Ideas for Using Free Animal Alphabet Graphics

Here are some ideas on how to use our set of free printable letters illustrated with animals:

  1. Alphabet Wall Display: Print out the letters and their corresponding animal illustrations. Laminate them for durability and create an alphabet wall display in your classroom or home. Arrange the letters in alphabetical order, and invite children to identify and match the animals to their respective letters.
  2. Spelling and Phonics Activities: Create engaging spelling and phonics activities using the animal letters. For example, you can select a few letters and ask children to spell words that begin with those letters using the corresponding animal illustrations. This activity can help reinforce letter-sound recognition and early reading skills.
  3. Letter Sound Hunt: Hide the animal letters around the room or outdoor area. Provide children with a list of animal names and have them find the animal letters. As they find each letter, they can say the name of the animal and its initial sound. This activity encourages letter identification, phonics, and physical movement.
  4. Animal Alphabet Book: Create an animal-themed alphabet book using the printable letters and illustrations. Assign each student a letter and have them draw or find pictures of animals whose names start with that letter. Compile the pages into a book, with each letter and animal on a separate page. This activity promotes creativity, letter recognition, and vocabulary development.
  5. Animal Name Puzzles: Print out the animal letters, then laminate and cut them into puzzle pieces. Mix up the pieces and have children assemble the puzzles to put the letters back together again, recognizing the letter and animal. This activity promotes problem-solving, fine motor skills, and letter-sound association.

Remember, these activities can be adapted to different age groups and learning levels. You can also combine multiple ideas or come up with your own variations based on the specific needs and interests of the children you’re working with. Enjoy exploring the animal alphabet!

Free Printable Red Watercolor Heart Illustration (Landscape)

This red watercolor heart embellishment is in a landscape format and is free for you to download and use to create romantic and Valentine’s Day projects. Use the heart to make handmade cards, to add to digital scrapbook projects or planner pages, make invitations – and so much more!

Being in landscape format, this heart graphic is ideal for making handmade cards.

More Heart Themed Printables HERE

The hearts are saved as high resolution PNG files and will give you great quality prints at large sizes

Check out our blank heart templates here – free heart templates.

Don’t forget to sign up to our newsletter! Be the first to know of new freebies and other fun things! SIGN UP HERE 🙂

Download Free Watercolor Heart:

Red Watercolor Heart

How to Make a Valentine’s Day Poster for FREE!

In this tutorial we’re going to look at how to create a Valentine’s Day poster using free graphics here at makebreaks and a brilliant online graphics package which is fully featured yet free to use 🙂

While we’re making Valentine’s Day posters here, you can, of course, change the look and feel of the poster to suit any occasion.

This is the poster we are going to make:

Why Make a Valentine’s Day Poster?

Make a Valentine’s Day poster for a loved one or friend as a gift to show them how much they mean to you and that they are in your thoughts. This might be a romantic themed poster for a partner, a cute ‘I love you’ poster for a child or a simple ‘I appreciate you’ poster for a neighbour.

The posters can be used a substitute for cards or as wall art to decorate a room or bring a smile to someone’s day.

Printing

We’re designing this poster to print on a home printer. However, you can make the poster any size and take to a professional print shop if you require. We recommend printing on good quality paper or cardstock for the best possible results.

About Photopea

We highly recomend Photopea as it is a fully featured, extremely powerful yet free to use application. It opens in your browser, so there is no software to download to your computer. You can use Photopea without opening an account. There is a paid for version which removes the ads, and this is a great way to support the developers of Photopea.

You can, of course, use any graphics software to make this poster, however if you are starting out with digital crafting, we suggest using Photopea.

How to Make a Valentine’s Day Poster

First, grab your graphic! We’re using the heart graphic which is free to download HERE. Then head to Photopea (https://www.photopea.com/) and click on ‘New Project’:

When the new project panel opens, you will see there are a number of canvas sizes ready created. Click on the ‘Print’ header and select the size paper you want to print your poster on. I have selected ‘A4’. You will see that when you have selected your paper size, the document is created at the correct size for you.

You should now have a blank canvas ready to start creating with 🙂

Place the Heart Graphic

Now we are go going to place the heart graphic. To do this click ‘File’ and select ‘Open and place’:

Navigate to where you saved the file and then drag it into place on your canvas. Resize the graphic as you require:

Image 2023-01-12 at 11.26.41 AM

Now would be a good time to save your file. Go to File > Save as PSD and save the file to your computer.

Add The Color Box and Text

Now it’s time to get creative!

We’re going to draw a box under the graphic which will contain the colored background for the text.

Use the rectangle shape tool to draw a shape on your canvas:

The chances are the box you have created is not the color that you want the finished background to your text to be.

It’s easy to change the color, however. Look in the layers panel on the right of the page and double click on the layer with the shape you just drew. Double click on this and it will open up the color selector, then use the eye dropper tool from left hand tool bar and pick a colour from the graphic (or use our free Color Palette Generator).

Tip: Remember, any time you want to edit an element, double click on the relevant layer in the layers panel to activate it.

Add Text To Poster

Now let’s add the text!

Before we do, make sure the arrow icon (select tool) is clicked at the top of the tool bar on the left. Then look at your menu bar and confirm that both ‘auto select’ and ‘transform controls’ are checked. This will make it easier when you want to edit the text or other elements on the page.

Then pick the text tool on the left hand side and add the text. You can choose from a number of fonts (tip: this may just have been a quirk, however I noticed when I was creating this that the font panel appeared to be blank and in order to see the fonts I needed to type something into the search bar – so if you experience the same thing, try that).

To edit the text color or font, double click on the text layer in the right hand layers panel. Another tip 🙂 when I have text on two lines, rather than using a line break (ie press enter to split the lines), I create two independent text layers. This means I can easily move them around as they are not connected until I am happy with how they look.

Export Your Finished Poster

When you’ve finished, it’s time to export your poster. To do this, go to File > Export as and then select your format.

If you are printing on your home printer then JPG or PNG will be good choices. If you are using a printing company to print the poster for you, check with them to see what format they prefer.

And that’s it!

Once you are familiar with the main process, it’s super easy to create posters in a variety of styles for any occasion!

How to Use Our Greeting Card Templates

Have you downloaded our free greeting card templates to make your own greeting cards but not sure how to use them? In that case read on and we’ll explain how to use these free greeting card templates in Procreate and other applications to make your own custom greeting cards.

What are Greeting Card Templates?

Greeting card templates are simply templates which are exactly the right size to make greeting cards and which show the lines you should cut around after printing the file and also the line you should fold along to compile the card.

Templates are useful as it saves calculating the size you need, particularly when working on smaller devices where this sort of thing can be a little fiddly.

The template forms the guides for you to create your design in. If you are using an application which supports layers (ie Procreate, Affinity Designer/Photo – in fact most graphics packages support layers), you can use our files and create your design under our template and then reduce the opacity of the template when printing so you don’t get dark lines around your card.

How to Use Our Free Greeting Card Templates

First, download the templates you want to use. You will find our templates HERE.

Unzip the folder and you will find four different formats:

    Multiple Layers

    For your convenience, I have created the files in each format (except PNG) with multiple layers you can switch on and off as required.

    This will depend, of course on your project, however if you create a design which fits exactly within the template, you may choose to switch off the cutting line as you don’t need it and just keep the folding line (however I recomend reducing the opacity).

    If you are creating a minimalist card, try turning down the opacity of the cutting outline as far as it will go so you don’t need to worry about dark lines around your card. ALSO, switch off the folding line as you will see there is a further layer with two tiny marks which you can use to fold which don’t go across the entire card.

    You will see that each layer is clearly marked in the layer panel.

    Tips for Using Templates to Make Greeting Cards

    When you print your finished card, print it on as good quality paper or cardstock as possible. Normal office print paper is too thin and will give poor results.

    Consider the cost of printing if you are printing a lot of fully colored cards. You can create great looking cards with simple black and white designs with just tiny pops of color.

    Don’t be afraid to add a scrapbook embellishment or two to your finished card. A couple of stick on jewels or a sticker can add a pleasing finish to the card.

    Remember to check which way up to put your design! If in doubt, mock it up first on a piece of scrap paper.

    If you don’t know where to start, try using one of our coloring pages to make your cards. Our digital coloring pages can be colored directly in your graphics package making this a super-quick way to get started!

    Free Printable Red Watercolor Heart Illustration

    This red watercolor heart embellishment is free for you to download and use to create romantic and Valentine’s Day projects. Use the heart to make handmade cards, to add to digital scrapbook projects or planner pages, make invitations – and so much more!

    👉👉👉 Looking for more heart illustrations? We have a pack of 15 watercolor hearts HERE!

    Free Printable Watercolor Heart Formats

    For your convenience you will find both PDF and PNG files in the download. These can be used in most graphics software and the PDF file is print ready should you want to print it ‘as is’. The files are 300 dpi in size, which will give you great quality prints for cards and posters.

    If you like this style, but would prefer an illustration in landscape, we have a watercolor heart in landscape format HERE.

    ✨✨✨More Heart Themed Printables HERE✨✨✨

    If you are not sure how to use this heart, why not make a Valentine or romantic themed poster? We have a tutorial HERE which shows you how using free software!

    Check out our blank heart templates here – free heart templates.

    Don’t forget to sign up to our newsletter! Be the first to know of new freebies and other fun things! SIGN UP HERE 🙂

    Download Free Watercolor Heart:

    Red Watercolor Heart

    Free Printable Cute Valentine’s Day Graphic

    This cute free Valentine’s Day graphic includes a little creature with a heart – perfect for making handmade cards, posters and other projects. Why not print the graphic and add it to a frame to make a quick and easy (and low-cost) Valentine’s Day Gift 🙂

    👉👉👉 Looking for more Valentine’s Day illustrations? We have a pack of 15 watercolor hearts HERE!

    Free Printable Valentine’s Day Graphic Size

    I have added two versions to the download file. You will find the large Valentine’s Day graphic is 3000px square, which will give you excellent quality prints, even at larger sizes. I have also included a smaller 1024px file which I have optimized for digital use. The files are saved in PNG formats to give you the best possible quality to work with.

    ✨✨✨More Heart Themed Printables HERE✨✨✨

    If you want to use this graphic to create a poster. we have a tutorial HERE which shows you how using free software or add it to a our free greeting card template to create a quick handmade card.

    Check out our blank heart templates here – free heart templates.

    Don’t forget to sign up to our newsletter! Be the first to know of new freebies and other fun things! SIGN UP HERE 🙂

    Download Free Watercolor Heart:

    Cute V Day Graphic

    Free SVG Cutting File – Best People Are Born in March

    Free SVG cutting files! This free ‘Best People Are Born in March’ month header cutting file is yours to download and cut using your Silhouette or Cricut cutting machine.  This free cutting file is perfect for birthday gifts or to make a header for a planner. Use this free svg file to make cards, signs and t-shirts for a loved one.

    All our cutting files contain the following formats:

    • SVG
    • DXF
    • EPS
    • PNG

    These free cutting files are ready for you to download and use in your cutting machine or for other crafts.

    Looking for more free SVG cutting files? We have a lot more for you, just click below to find our complete collection.

    More FREE SVG Cutting Files

    We have a variety of cutting files available to cover a whole range of occasions and celebrations. If you would like to make a suggestion for new designs, you are very welcome to leave a comment below!

    Don’t forget to sign up to our free printables newsletter! Be the first to know of new freebies and other fun things! SIGN UP HERE 🙂

    Download Free SVG Cutting File

    Free SVG Cutting File - Best People Are Born in March

    Best People Are Born in March Free SVG File

    How to Load Your Custom Palettes to Procreate

    When you use our free color palette generator to create your own custom color swatches for Procreate, it’s super easy to download them and add them to Procreate.

    First Create Your Palette

    If you haven’t done so already, go to our free color palette generator and create first create your color palette.

    Choose the photo or image you want to use, select the number of swatches you desire and then give the swatch a name and click ‘download’.

    Upload The File To Procreate

    When you have downloaded the file, it’s simple to just add the file to Procreate.

    Tip: If you have saved the swatch file to your desktop instead of your iPad, you will need to upload the file to your iPad. Either add it to your iCloud files, email it to yourself or save it to the cloud to retrieve from you iPad.

    Then just go to where you saved the file on your iPad and tap on the swatch file you have just created. It will then automatically be added to Procreate and you will see the swatches in the color palette menu 🙂

    A Year Of FREE Coloring Archive 2023

    Get ready to unleash your creativity with our ‘2023 Year of Coloring’ project! Each week, we’ll be sharing a new and exciting free coloring page that you can download and color to your heart’s content. Whether you prefer digital coloring in apps like Procreate or traditional coloring with your favorite media, we’ve got you covered.

    To make the most of your coloring experience, here are some tips:

    • Digital coloring: Experiment with different brushes and textures to add depth and interest to your image
    • Traditional coloring: Use light and dark shading to create depth and dimension
    • For both digital and traditional coloring: Don’t be afraid to mix and match colors to find the perfect palette for your image

    Sign up for our newsletter to be the first to know when new pages are published, and feel free to share with friends and family. Get ready to immerse yourself in a world of color and creativity!

    Tag us at @makebreaks on Instagram to share your finished results 🙂

    No post found

    More Free Coloring Pages For Adults to Download

    No post found

    FREE Monster Digital Coloring Page

    Here’s a cute little monster digital coloring page for you to download. This funny monster coloring page features a creature with a cupcake and a cherry on his head 🙂

    If you are not familiar with digital coloring pages – these are pages I have designed specially for use in apps such as Procreate and Affinity Designer/Photo as well as desktop apps such as Photoshop. Plus they can be used in free graphics apps like Medibang, Ibis Paint and the fantastic Photopea which is a free application you can use in your browser (nothing to download!).

    If you are new to digital coloring, you will find a video walkthrough below and a tutorial HERE.

    GET STARTED WITH DIGITAL COLORING PAGES

    In short, a digital coloring page is a file I have created with a transparent background. There is no opaque white on the page as you would find in a traditional coloring page. This means you can use it in a package like Procreate and use layers to color UNDER the design. Many of these pages have transparent shading so they are super-easy to use and to get great results!

    High Resolution Files

    However, unlike many other digital products which are created with lower resolution for digital use, I have created these as high resolution files at 3000 x 3000 px, which means you will get high quality prints even at larger sizes (print 10″ x 10″ at 300dpi or 20″ x 20″ at 150dpi).


    Find more free digital coloring pages HERE


    I would LOVE IT if you tag me on Instagram or your favourite social media site if you use these pages  #makebreaks #digitalcoloring 😀

    If you would like me to share your finished artwork on the site or social media, you are very welcome to send me a finished copy of your project (you are welcome to watermark it). Send it to kate@makebreaks.com with any info about how you would like me to credit your work and website or social media links.

    Want to know when new free coloring pages are added? Be the first to know of new freebies and other fun things! SIGN UP HERE 🙂

    Download Free Monster Digital Coloring Page

    Cute Cupcake Monster 1

    Find more free coloring pages HERE